What is it and why?
Put into the most basic terms a website wireframe is the skeleton of a website before you add the flesh and then the clothing. The outlined structure of what the website will become.
There are definite benefits to the creation of a website wireframe. The wireframe clarifies conceptual elements, certainly helps you visualise the direction and structure of the site, helps refine elements such as navigation and overall saves time and need for redesign. It is especially useful to get you on the same page as your client and iron out any potential misunderstandings before embarking on the full scale project.
Some would argue that wireframing limits design creativity and, whilst this is a valid point, surely the advantages outweigh this complaint. Afterall your site’s functionality is imperative and this is absolutely helped by a good website wireframe.
So, in our view it is advisable for all sorts of reasons to wireframe, and the process deserves your attention. This article is a useful guide to the steps of creating an effective wireframing.
1. Find inspiration
Many people think that inspiration is about style and color, choice of images and illustration, fonts and textures. It’s true to a certain extent but great art is well planned, from the essentials of materials, form, structure and websites shouldn’t be any different. Without the foundations, it really doesn’t matter how beautiful the house is decorated or furnished.
Your design needs an overarching vision. The inspiration is all around you on the web, take some time, browse different sites (keep notes of ones you’ve liked, they may be useful next time), and remember don’t be drawn in by the fancy visual you are focusing on the structure. Some elements will work for your project, others won’t, you don’t need to base your site on another but elements of several.
Collaborate on ideas and vision with the client, what are their favourites sites and why. Go through them together, it’s not only an important step to get ideas but it also helps form a trusting, professional client developer relationship. Show you are listening and offer your experienced expert advice.
Tools such as Wirify, let you turn a site into a wireframe in one click. You can hide the content and see the bigger picture. Once you’ve stepped back and seen the vision, it’s time to move forward to the sketching.
2. Grab a pencil and sketch

Sketching isn’t wireframing, but it’s a vital step towards it. The sketch is the way to get your ideas out of your head and start putting them into physical form (paper or digital). We’re not looking for perfection and accuracy here and neither is it a finished guideline of the eventual site. Play around with the ideas, see how they come out, experiment, push ideas, innovate.
Encourage your client to do something similar, compare your joint visions, discuss, sketch some more. Offer and think through alternatives, share your thoughts and vision with colleagues or friends, get and listen to feedback. And then sketch some more. Happy now? So let’s look at how we are going to get these sketched ideas onto more concrete ground.
3. Choose your tools
Where there is a market, there are tools. Wireframing is big news, (we’ve seen the benefits) and there are plenty of digital tools to choose from to help you. Famous names like Adobe Illustrator, Axure and Indesign, online tools such as Mockingbird, Mockflow, Hotgloo, free tools like Balsamiq and Figma. We are not here to take you through the pros and cons of each – not in this article at least, but suffice to say, you are not lacking in choices.
The tools will enable you to create website wireframes, quickly and easily. There are of course various features to help you even more for example some tools offer collaboration features and application integration. Here is not the place to go into detail. You may already have a favorite but it’s worth shopping around and looking at alternatives, they are getting better all the time. It’s a competitive market, and the fierceness is driving these tools forward.
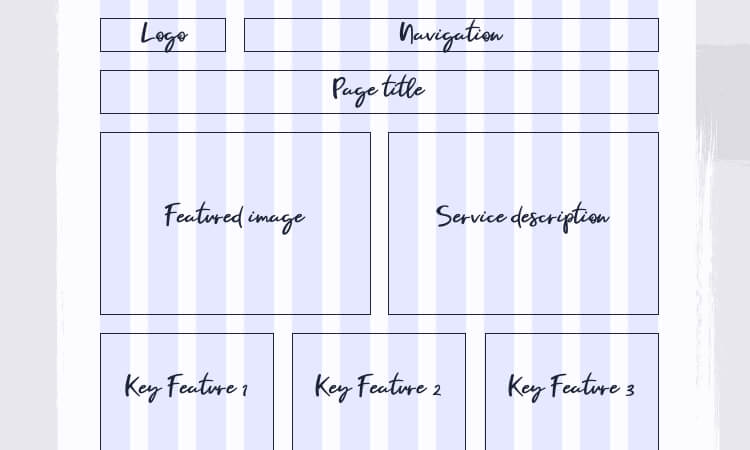
4. Use a grid to start wireframing
You’ve got the vision, put it on paper, and selected the tools of your choice. Everybody is onside and you’re ready to wireframe.
So use a grid. The grid will significantly help you arrange and align, structure and organize and size differing elements of your design. The usual way is to lay out your site in boxes and take the role of future content, images, text, navigation tools etc. Here you are following your agreed sketches, mapping out the design. Start with the bigger sections like text sections, headers, footers and images and work smaller to details such as logo, social media buttons , calls to action. There are placeholders, now is the chance to alter the sizes and get something more concrete. It is low-fi but it crystalizes your ideas.
5. Play with the font sizes
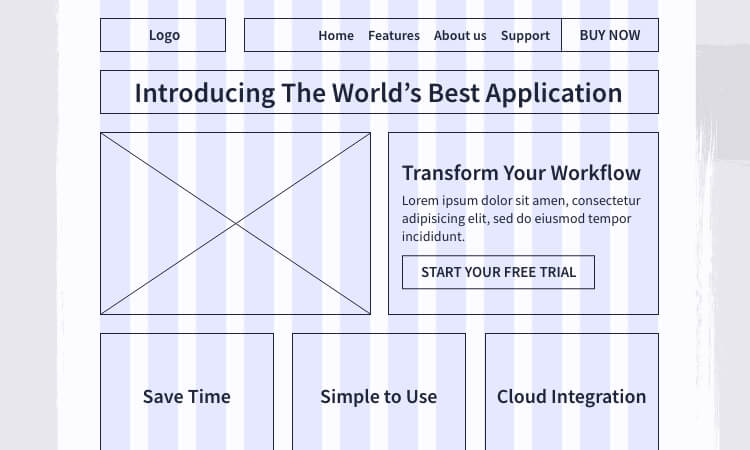
Fonts will play a really important role in the eventual site and you don’t have to choose the exact font type at this stage. However, using different fonts can give you real clues and a feel for what parts need to stand out, the feel for where the eye is going to be drawn to, a sense of relationship to various sections. Vary the font sizes for key primary sections and secondary sections. This creates a sense of the visual impact of the whole site. Don’t make the final font decisions yet but be aware of the impactful nature of these elements.
6. Leverage the grayscale
Whilst your website wireframe is sitting with empty placeholder boxes, or even example fonts, you are starting to get more a sense of where this is going. So let’s up the realism a stage further. We need to create some feel for the colors, like the fonts, this is not the stage to make final decisions but a guide to increase your sense of contrast, consistency and atmosphere.
By using the grayscale spectrum you can start to fill in darker and lighter areas, highlighting and creating depth without distraction of color. This allows you to give sections greater or lesser importance and gives the client a clear picture of what is to come. We are quite hi-fi but we’ve moved to mid-fi, and things are coming along nicely.
This could be enough, it could very well be the stage that you hand over your baby, if so do it with pride.
But………there is an optional further stage.
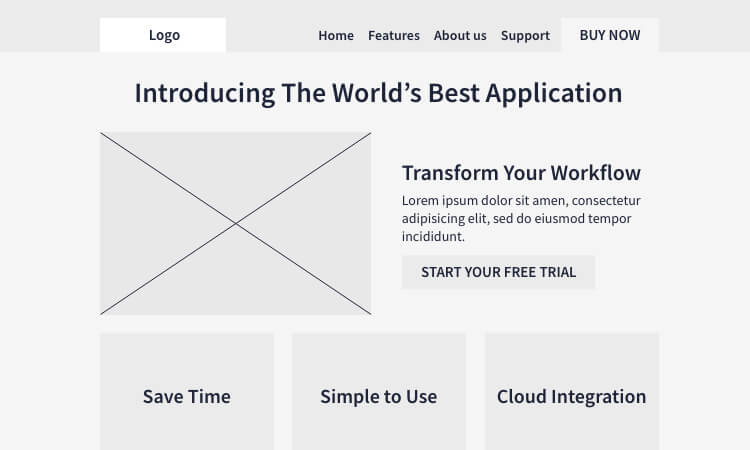
7. Going hi-fidelity
Finally this is the stage to get (hopefully) to add the detail and raise our wireframing bar to the next level. It’s been a smooth journey, so now let’s put the icing on the cake. Menus, styles, actual text, fonts, colors and images……we’re in danger of going from wireframe to design, you and your client will decide where you draw the line.
Final words
This a step-by-step guide, useful for sure, handy without a doubt but it isn’t the whole story. Now you know the steps to follow, the roles assigned to each stage, follow them faithfully and the end product then only (ONLY is a big word here) depends on your qualities, ideas, vision and abilities. We’ve given you the outline, now it’s up to you to wireframe.
You may also be interested in Website Methodologies: The Best Ways to Run Web Development Projects